Registering with MyAltro allows you to save all your favourite technical documents, blogs and videos in one place. Get access to exclusive content, additional technical support and more. Once you have submitted the registration form you will receive an email to verify your account. You will need to verify your account in order to log in, so follow the link in the verification email to complete this action.
When you set your password, it will need to be at least 8 characters including an upper case letter, a lower case letter, a number and a special character.
Enter your details below to login
Can't see the region you're looking for? You can find a list of our global locations here
You are currently on the site for Australia. We think you might be looking for the site for United States/Canada.
This fitting guide, whilst compiled to the best of our knowledge is for guidance only, and Altro Walls cannot be held responsible for any faults which may occur. If in any doubt, contact the Walls technical services department to answer any queries you may have. Tel: +44 (0)1462 480480.
The guide is intended to be used by experienced Whiterock fitters who already have a good working knowledge and practical experience of fitting Altro Whiterock cladding systems. All White, Pastel and Chameleon PVCu panels can be installed using the hot welded jointing technique.
Altro Whiterock ‘Illusions’ panels can not be hot welded
When installing Altro Whiterock panels with welded joints, it is imperative the substrate is to a very high standard. Surfaces should be true and level to + or – 2mm over a 3m straight edge. Recommended substrates include plasterboard, plywood, finishing plaster and most types of sand & cement render. We recommend all plastered surfaces are sealed with Unibond PVA sealer (or similar) diluted 1:10 before fitting panels.
When planning the layout of the panels it is important to minimise the number of joints in the cladding system. Ensure joints do not fall too close to corners. We suggest joints should not be formed any closer than 300mm from a corner. This will avoid any possible risk of mis-alignment between the joint when the next panel is fitted.
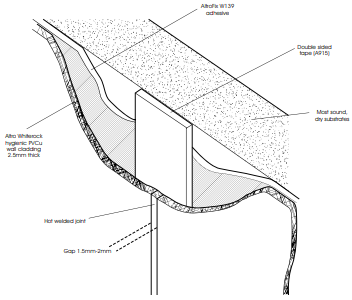
Before installing the panels, you must fit the white ‘Foam Double Side Tape” (A915) to the substrate at the centre point where the two panels meet. The double side tape is impregnated with a ‘contact adhesive’. Therefore, all substrates must be primed with a contact adhesive before fitting the tapes. The primer is only required where the 50mm wide tapes are to be fitted.

Ensure all panel edges (where joints are to be formed) are clean, smooth, true and level.
Always inspect new panel edges are undamaged or scored. If necessary, cut and plane to a ‘crisp’ square edge.
Check there are no ‘fines’ left on the edge of the panel. These ‘fines’ could burn when hot welding the joint and will leave a blemish which can not be removed from the joint.
When preparing the fitting of the panel, always ensure there is an adequate gap (2-3mm) between the panel and any rigid abutments (ceiling, windows, doors, services etc) to allow for expansion.
These ‘isolation’ joints must be sealed with Altro silicone sealant.
Altro Walls recommends Altrofix W139 adhesive for all welded installations.
After fitting the Foam Double Side tapes, leave the protective top film in place (this will be removed at a later stage).
Once the panels have been prepared and dry fitted to check everything is correct, apply the adhesive to the back of the panel in the normal way. Leave the adhesive approximately 25-30mm back from the edge where the double side tape has been applied.
Install the panel in the normal way, ensuring the panel is temporarily supported on timber blocks (or similar) to prevent slipping.
Check the panel is aligned with the datum line before rolling the panel to achieve a transfer of the adhesive to the substrate. When rolling the panel, start in the middle and work outwards. At this stage do not roll right to the edge where double side tape is located.
Once the panel has been rolled (almost to the edge), carefully cut down the edge of the panel where the tape is located, to cut through the protective top film.
Carefully ease out the edge of the panel to facilitate the removal of that half of the protective top film. Once this has been removed, press the panels firmly onto the tape to achieve a full bond.
Finally, complete the full rolling of the panel right up to the edge to ensure good transfer of the adhesive.
Make sure the exposed edge of the panel is clean and free of any adhesive residue. If necessary, clean thoroughly with Altro cleaner thinner
Prepare the next panel in the same way as described above. Before fitting this panel you must fit a series of “spacer pins” against the edge of the previous panel. This is to provide the correct ‘gap spacing’ between each panel. The spacer pins should be nominally 1.5mm – 2mm thickness. Do not exceed 2mm thickness.
Fit the next panel as described above, ensuring the panel is butted tightly to the spacer pins.
Once the panel has been rolled almost to the edge, remove the spacer pins and then remove the final part of the double side tape protective cover. Press the panel firmly onto the foam tape and then complete the rolling of the panel.
Check all edges are clean and free of adhesive residue.
Once the installation of the panels is complete, you are then ready to weld the joints. On larger jobs, you can weld the panels ‘as you go’. However, we recommend welding does not take place until the adhesive has completely set up. (Usually the next day).
Firstly, ensure your weld rod and the joint gap to be welded is clean and free of dust and contamination.
The hot welding technique used to weld Whiterock panels is basically identical to that used in vinyl floor laying. The same type of tools and welding gun can be used. (See attached tools list)
The Altro ‘welding rod’ is also very similar to that which is used in flooring.
Whilst most floor layers use the large ‘Leister’ Hot welding gun, this can be slightly cumbersome and heavy in the hand when welding 3 metres up a ladder.
The preferred welding gun is the ‘Leister’ Hot-Jet “S” welding gun, which is smaller and more compact.
The weld rod is passed through a standard 5mm ‘speed weld nozzle” which softens the weld rod and panel edges simultaneously to fuse the materials together under heat.
The temperature of the weld gun can be regulated and the settings depend on the speed at which you travel along the panel.
This is something each individual must practice to ascertain what suits your method of working.
In most floor laying work the typical speed would be approximately 2 metres per minute. However, this is not always practical when working vertically, so you must practice to gain experience of different situations.
This is often the part of the job which can be most difficult. Unlike flooring, you are welding a plain, smooth wall finish, which can highlight any imperfections in your work.
Whilst many fitters choose to use their ‘own’ pre-fabricated trimmers, at the end of the day – you need to have a trimming tool that you are confident in using and practice extensively with to get the live jobs right.
In our opinion, the range of trimming tools currently available to the flooring trade will achieve good results if care is taken.
After completing the welded joint you should pre-cut the joint using the spatula trimming knife (also known as the quarter moon knife).
Pre-cutting must be done by using the ‘trimming guide’ and spatula to take off approximately half of the weld rod. This allows the weld rod to ‘settle’ and will prevent sinking into the joint once the rod has cooled.
During this process, apply a liberal amount of Altro ‘Antistatic solution’ sprayed on to the joint before any trimming takes place. This will reduce any friction between the cutting blade and the panel and minimise the risk of scratching the panel.
After pre-cutting the weld rod, allow the rod to cool down sufficiently before completing the final trimming.
Once the rod has cooled down (cold) you can commence final trimming with the spatula (or your personal trimming tool).
Take care not to scratch or damage the Whiterock surface while undertaking this final part of the operation... “Practice makes perfect”.
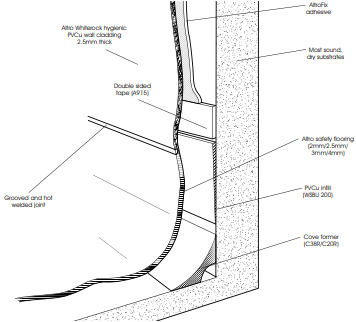
Altro Whiterock hygienic PVCu wall cladding 2.5mm thick installed over most sound, dry and level substrates to minimum 100mm height from floor, fixed with AltroFix™ W139 (A814) adhesive and double sided tape (A915), overlapping PVC infill section (WSBU 200).
Infill to be suitably positioned behind wall cladding to accommodate the various flooring thicknesses.
Altro safety flooring (2mm/2.5mm/3mm/4mm) fitted over cove former (C38R/C20R) and finished to PVCu cladding with pre-grooved, hot welded joint as per Altro installation recommendations.


Light and compact welding gun for walls and other detailed welding work.

Used for trimming of cold weld.

Used for trimming of cold weld.

For exact scribing of one sheet edge to the next sheet.


For welding PVCu wall PVCu wall sheets. The hot air outflow is very tight and directed into the groove.

Used with the quarter moon knife for pre-trimming of the weld rod.


Multipurpose gouge paired with either round or flat blades. To be used when the weld rod is cold.
NOTE: “Altro APAC Pty Ltd” (“Altro”) endeavours to ensure that advice and information given in Product Data Sheets, Method Statements and Material Safety Data Sheets (all known as Product Literature) is accurate and correct. However, where Altro has no control over the selection of its products for particular applications, it is important that any prospective customer, user or specifier, satisfies him / herself that the product is suitable for the intended application. In this process, due regard should be taken of the nature and composition of the background / base and the ambient conditions both at the time of laying / applying / installing / curing of the material and when the completed work is to be brought into use.
However, as site conditions and the execution of the work are beyond our control, we accept no resultant liability.
Altro’s policy is one of continuous research and development and we reserve the right to update our products and information at any time without prior notice.